Kung Pao Chicken with Zoodles

BLOG_August 19, 2014-3

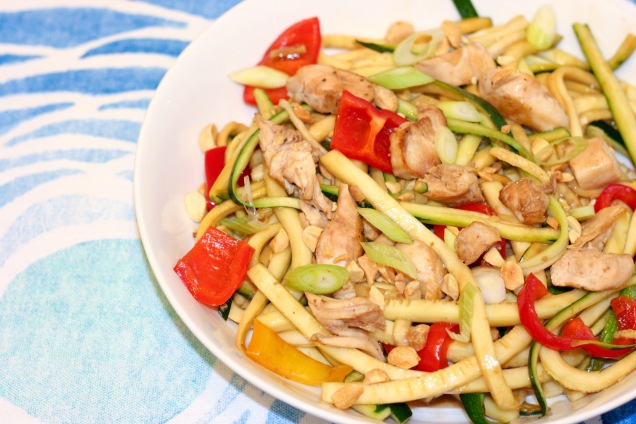
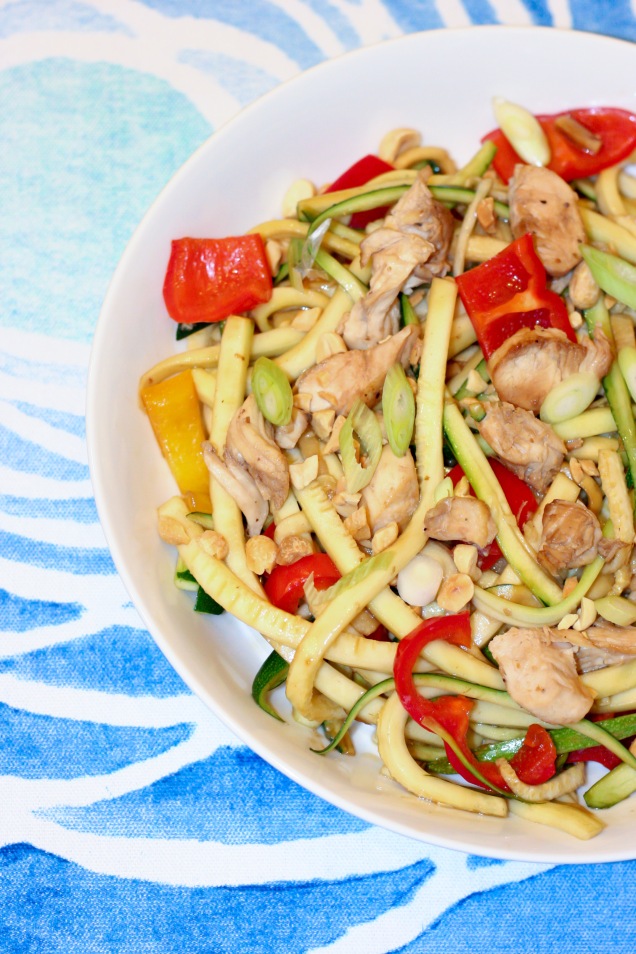
I recently stumbled across this recipe on Skinnytaste and had to make it – like right away. Not only did it look amazing, but this was my call to finally make zucchini noodles.  I’ve seen “zoodles” a zillion times, but never got around to preparing them. This was the perfect recipe for my first taste; they soak up the delicious sauce perfectly and were light, but filling. The original recipe was for two, so I’ve adjusted to make this a 4-person serving, or for 2 very hungry people! Enjoy.

I used a mandolin with a julienne blade, but you can also use a spiralizer if you have one. I played around with the cut and found I liked the slightly thicker 4.5 mm julienne cut the best. The thickness is totally a personal preference, so use whatever cut you prefer.

Vegetarians could totally swap the chicken for tofu, and in fact, I think next time I make this I will do the same. Tofu or tempeh would go great with this refreshing, light dish.


BLOG_August 19, 2014

If you like this, you may also like Kung Pao Chicken Tacos – one of my favorite recipes!

Kung Pao Chicken with Zoodles
Author: Adapted from Skinnytaste.com
Prep time: 15 mins
Cook time: 15 mins
Total time: 30 mins
Serves: 4
Ingredients
  • 2 lbs. zucchini (med/lrg zucchini work best), washed & ends trimmed
  • 2 tsp. canola oil
  • 1 lb. chicken breast or chicken tenderloins, cut into bite-size pieces
  • S/P
  • 1 red bell pepper, chopped
  • 2 tsp. sesame oil
  • 2 cloves garlic, minced
  • 2 tsp. fresh ground ginger (feel free to add more if you really like ginger – I do!)
  • Crushed dry roasted peanuts to top
  • Sliced scallions to top
  • Sauce —
  • 4 tbsp. reduced sodium soy or tamari sauce
  • 2 tbsp. rice vinegar
  • 2 tsp. hoisin sauce
  • 3 and 1/2 tbsp. water
  • 1 tbsp. roasted red chili paste
  • 1 tsp. sugar
  • 3 tsp. cornstarch
Instructions
  1. Using a spiralizer or mandolin with julienne blade, cut the zucchini into long, spaghetti-like strips. If using a spiralizer, cut the strands into pieces that are about 8 inches long so they are easier to eat.
  2. In a small bowl, whisk together all the ingredients for the sauce and set aside.
  3. Season chicken with S/P. Heat the canola oil in a large skillet or wok over medium-high heat. If you prefer, you can cook the chicken whole and then chop after they are cooked. Either way, cook the chicken until browned and cooked through. Remove from heat and set aside on a separate plate. If you haven’t chopped yet, chop or shred into bite-size pieces before adding to final step.
  4. Reduce heat to medium and add the sesame oil, garlic, and ginger to the skillet and cook for about 30 seconds. Add the bell pepper and stir in the sauce, bring to a boil. Reduce heat to a simmer and cook another minute or so until thickened. Stir in zucchini noodles and cook for about two minutes at most until tender and covered with sauce. The zucchini releases water and should thin the sauce out a bit. Remove from heat and stir in chicken. Top with peanuts and scallions.
Notes
When I cook chicken for recipes like this I prefer to cook tenderloins because they cook faster. I also prefer to chop/shred the chicken after cooking it. Chicken breast or tenderloins will work perfectly here and you can decide to cook the chicken whole and then chop, or chop prior to cooking.


White Beans with Black Olive Vinaigrette


BLOG_July 28, 2014This is a truly simple vegan salad that is delicious on its own or mixed into a green salad. Makes a quick and easy lunch or dinner.

White Beans with Black Olive Vinaigrette
Recipe Type: Salad
Author: Canal House Cooking
Cook time: 10 mins
Total time: 10 mins
Serves: 4-6
Ingredients
  • 1 garlic clove, minced
  • 1/4 cup finely chopped pitted black olives
  • 1 tbsp. finely chopped parsley leaves
  • 1 tbsp. red wine vinegar
  • 1/4 cup olive oil
  • Pinch of crushed red pepper flakes
  • S/P
  • 2 cans cooked cannellini beans
  • Lettuce, optional
Instructions
  1. Mix together all ingredients from garlic to red pepper flakes in a large bowl. Season with S/P. Add the beans and toss gently to coat. Taste and adjust seasoning as needed. Serve atop lettuce or a tossed salad, or eat on its own.


Dark Chocolate Peanut Butter Brownies

BLOG_July 29, 2014

Two of my favorite things in one decadent dessert, alright alright alright. These are BIG brownies, so they are meant to be cut into small squares, but if you want to eat the whole pan I won’t judge you.

The peanut butter top is made with cream cheese (I used reduced fat – in case you’re also inclined) so it’s actually not overwhelmingly sweet, but a mild creamy peanut flavor that pairs perfectly with chocolate. Enjoy!

Peanut Butter Dark Chocolate Brownies
Author: Q&DK
Cook time: 1 hour 30 mins
Total time: 1 hour 30 mins
Serves: 12
Ingredients
  • 1 box Ghirardelli Dark Chocolate brownie mix
  • 2 8-oz packages cream cheese, softened
  • 1 cup creamy peanut butter
  • 1 and 1/4 cups confectioners’ sugar
  • 2 oz. semi-sweet chocolate (I used 1/2 of a 4 oz. Ghirardelli baking bar)
  • 1 tbsp. butter
  • 2 tbsp. heavy whipping cream
Instructions
  1. Bake the brownies according to the box instructions in an 8×8 pan. Let cool completely.
  2. In a large bowl, beat together the cream cheese and peanut butter until combined. Sift the confectioners’ sugar over the cream cheese mixture and beat until smooth. Using a spatula, spread the mixture over the brownies and smooth evenly.
  3. In a heat-proof bowl set over a small saucepan of simmering water, melt the chocolate and butter. Add the whipping cream and stir until smooth and glossy. Remove from heat and let cool. Drizzle the cooled melted chocolate over the peanut butter layer. Place in the refrigerator and let chill until firm. Cut into bars and serve.


Loaded Miso Soup

Processed with VSCOcam with f2 preset

I’ve been craving miso soup like crazy, but really wanted something that would provide a full meal. So why not make miso soup loaded with goodies to make a complete meal?

Done and delicious.

This makes a large pot with 4-6 bowl-sized servings. Great for lunch or dinner, and perfect for packing for work lunches. Enjoy!

Loaded Miso Soup
Author: Q&DK
Serves: 4-6
Ingredients
  • 8 oz. Somen, rice vermicelli, Soba, Udon or any other type of noodle
  • 1 tbsp. olive oil
  • 2 cups sliced bok choy, stems and leaves
  • 1 bunch scallions, sliced (whites and greens)
  • 5 slices peeled fresh ginger
  • 8 oz. diced tofu, drained
  • 6 cups water
  • About 5 tbsp. miso, to taste
  • Salt, optional
  • 2 cups baby spinach, or chopped spinach
  • Soy sauce
Instructions
  1. Cook the noodles according to package instructions and reserve a tbsp. of pasta water. Drain and set noodles aside; toss with the pasta water to prevent sticking.
  2. In a large pot set over medium-high heat, heat the olive oil and then add the bok choy, scallions, ginger, and tofu. Cook until fragrant and tender, about 3 minutes.
  3. Add 5 cups of water to the pot – reserve the last cup and add the miso to that cup and whisk until smooth (this just makes it easier to dissolve the miso). Add the miso water to the pot, stir to combine.
  4. Bring the soup to a simmer and let cook about 10 minutes. Do not boil, just simmer. Taste and adjust seasoning by adding more miso, and/or salt if needed. Once the seasoning is adjusted, stir in the spinach and a splash of soy sauce. Remove from heat.
  5. Add noodles to each bowl and then ladle soup onto the noodles. Serve immediately. Store leftover noodles separately – if you store them in the soup they can soak up the broth and become soggy.
Notes
Miso comes in three types: red, yellow, or white. Any variety works in soup. I use a type called Mellow White Miso. I have to buy it at Wholefoods or Asian markets in a refrigerated area. Do not just get a miso soup mix – you want actual miso. Different types vary in the strength and sodium which is why I can’t put an exact tbsp. amount in the recipe. Start with a few and then taste. The Mellow White is mild and low in sodium so I use a good amount and add a bit of salt to taste.


How to Make Crepes

Crepes are one of those things I just assumed must be difficult to make, so even though I LOVE them, I always ordered them out. But thanks to America’s Test Kitchen great recipe, I finally made them at home and was shocked at just how easy they were to make. Easier (and faster) than regular pancakes in my opinion.

I devoured almost the entire batch (10 crepes!) with fresh squeezed lemon and a dusting of sugar – so delicious! You could, of course, fill these with anything – fresh fruit, jam, chocolate, nutella … the list goes on.

If you follow the instructions carefully these are really so simple. But this is not the type of recipe you can leave for any amount of time, they cook in a matter of seconds so you need to be at the stove at all times.

How to Make Crepes

Author: Slightly adapted, America’s Test Kitchen
Serves: 10
Ingredients
  • 1/2 tsp. vegetable oil
  • 2 tbsp. unsalted butter, melted and cooled
  • 1 cup unbleached all-purpose flour
  • 1 tsp. sugar
  • 1/4 tsp. salt
  • 1 and 1/2 cups whole milk
  • 3 large eggs
  • Any desired toppings/fillings
Instructions
  1. Place oil in a 12-inch nonstick skillet set over low heat for at least 10 minutes. Prep your butter by melting over stove top or in the micro (I suggest 10 sec increments so you don’t overdo it); set aside and let cool.
  2. While skillet is heating, whisk the flour, sugar, and salt in a medium bowl. In another bowl, whisk together the milk and eggs. Add half of the milk mixture to the dry ingredients and whisk until smooth. Add the butter and whisk until incorporated. Whisk in remaining milk mixture until smooth.
  3. Using a paper towel, wipe out skillet, leaving a thin film of oil on bottom and sides. Increase heat to medium and let skillet heat 1 minute. Test the heat by placing 1 tsp of batter in the center and cook for 20 seconds. If the mini crepe is golden brown on bottom, the skillet is properly heated; if it is too light or too dark, adjust heat accordingly and retest.
  4. Pour 1/4 cup batter into one side of the pan and tilt/shake gently until batter covers the bottom of pan evenly. Cook without moving until the top surface is dry and crepe is starting to brown at edges, about 20 seconds. Loosen one side with a rubber spatula and flip, using your fingertips to help if needed. Cook about another 20 seconds unitl the second side is lightly spotted. Transfer crepe to a wire rack to cool and continue cooking until batter is gone, letting the pan reheat for about 10 seconds in between crepes.
  5. To reheat, stack on a plate and invert a second plate over the crepes. Microwave until warm, about 30 seconds. Top crepes with desired fillings and fold into quarters, roll, or stack flat like pancakes. Serve warm.